
Getting Started: Part 3
In this guide, you will create a more full-fledged "to-dos" application. You will:
- Generate a new statechart-based application called TodosThree.
- Edit files created by the generation boilerplate system.
- Add a models directory, containing the Todo model definition.
- Add two controllers.
- Add a fixtures file with JSON-formatted sample data.
- Celebrate powerful SproutCore programming constructs, learned along the way.
1 - Following Along
You have learned in previous guides how to use sproutcore init to make a project directory and to create apps in the project apps directory. You have learned how to run sproutcore serve in the project directory, and how to view apps in a local browser at localhost:4020/. You have learned about SproutCore app concepts, including knowledge of views and statecharts. We will build on that foundation to produce a TodosThree app with components of a best-practices SproutCore app.
You would benefit from carefully following the instructions in this guide to create directories, to type in code (or to copy and paste it), because it will register in your mind solidly. The presentation is written as if you would add the app in this manual fashion, although you surely might prefer instead to get the finished source code and read along as if you had done it manually:
You may wish to clone with git clone git://github.com/sproutcore/getting-started.git getting_started from Github into your work area.
Reminder: These "Getting Started" guides attempt to strike a matter-of-fact tone that doesn't sugar-coat complexity too much, but tries not to overwhelm. We are ramping up to inherently more challenging concepts, however. If you need help, please ask questions in IRC or on the mailing list, with references to the numeric heading for relevant sections of this guide page.
2 - Creating A TodosThree Application
Here is a screen capture of the completed application:
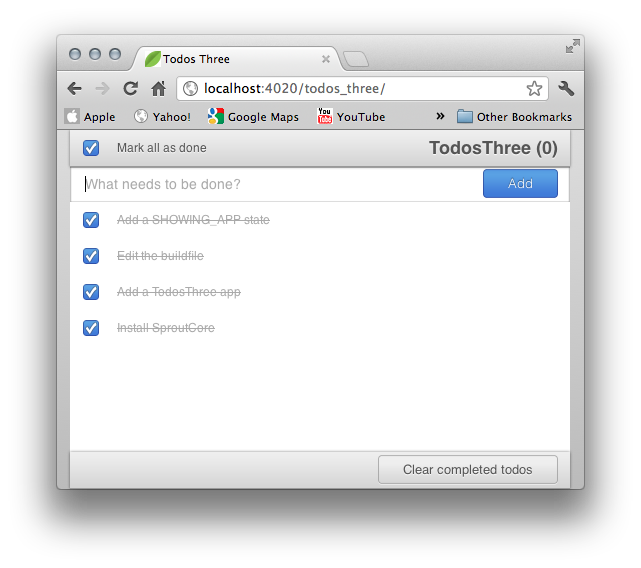
The TodosThree app looks simple. It has toolbars at the top and bottom. It has a text field near the top, where a user types in a new todo. It has a list of already added todos. Even such a simple-looking app like this involves the use of intelligent SproutCore programming.
We can describe these intelligent aspects, generally, as the "system of connections" or, in the manner an electrician would use, as the "wiring diagram." SproutCore apps have bindings and observers between various components of the user interface and those of underlying machinery, the normal complement of events in a web app, and actions coordinated with states.
You see the components of the user interface in the screen capture: checkboxes, buttons, text fields, list views, etc. We'll be looking at the underlying machinery.
This will be the directory structure for the TodosThree app:
- getting_started/ - The project directory, for holding several apps.
- sc_config
- README.md
- apps/
- TodosThree/
- sc_config
- core.js
- main.js
- theme.js
- statechart.js
- states/
- ready.js
- logging_in.js
- showing_app.js
- showing_destroy_confirmation
- resources/
- loading.ejs
- main_page.js
- todo_item.js
- _theme.css
- styles.css
- controllers/
- todos.js
- completed_todos.js
- models/
- todo.js
- fixtures/
- todo.js
- TodosThree/
Here is that directory structure again, with descriptions for each item:
- getting_started/ - The project directory, for holding several apps.
- sc_config
Configuration for the project - README.md
Describes your app and how to use it - apps/
- TodosThree/
- sc_config
Configuration for the TodosThree app - core.js
TodosThree app creation code - main.js
Adds a data store, and calls the TodosThree.mainPage view - theme.js
Adds a TodosThree.Theme based on the SproutCore Ace theme - statechart.js
Contains main app states and substates - states/
- ready.js
A single state, the READY state, which plugs in to the app's statechart - logging_in.js
The LOGGINGIN state (not used in TodosThree, but there for illustration)_ - showing_app.js
The SHOWINGAPP state, the general state for responding to user actions_ - showing_destroy_confirmation
The SHOWINGDESTROY_CONFIRMATION state_ - resources/
- loading.ejs
A short html file to show when the app is loading - main_page.js
The TodosThree.mainPage view - todo_item.js
TodoItem code for a checkbox and a title - _theme.css
Contains per directory theme setup - styles.css
Defines css for theme styling - controllers/
- todos.js
TodosThree.todosController, an SC.ArrayController to hold todo items - completed_todos.js
TodosThree.completedTodosController, another SC.ArrayController - models/
- todo.js
TodosThree.Todo, the definition of the Todo SC.Record type for the app - fixtures/
- todo.js
Fixtures data (for testing the app without hooking to a database) SproutCore is a powerful system, challenging to master, but not so difficult to learn, provided that we take it one step at a time.
We can use the sproutcore gen command again, to create part of the directory structure shown above for our TodosThree app (You should be in the ~/development/sproutcore/getting_started project directory):
$ cd ~/development/sproutcore/getting_started
$ sproutcore gen app TodosThree
Your project has been successfully created!
**GIT**: git add apps/TodosThree & git commit -a -m 'Added TodosThree app with _sproutcore gen app TodosThree_ command.'
Where you see such GIT notes in this guide, you can ignore them. If you know what they mean, you may use these cues to commit to your own repo as you go. They are really for internal use in generating the associated repo.
We will work through the app, directory by directory, file by file, to edit those files and to add other needed directories and files.
2.1 - The App Root Directory
There are four .js files in the TodosThree app root directory (~/development/sproutcore/getting_started/apps/TodosThree/):
theme.js core.js . main.js statechart.js Edit these files to assure their content matches that given in the following sections:
2.1.1 - theme.js (app root directory)
apps/TodosThree/theme.jsTodosThree.Theme = SC.AkiTheme.create({ name: 'todos-three' }); SC.Theme.addTheme(TodosThree.Theme); SC.defaultTheme = 'todos-three';TodosThree.Theme is a derivative of SC.AceTheme, a very nice professional theme. You can override parts of the Ace theme as you wish, or switch it out entirely. In theme.js, TodosThree.Theme is registered with the system, and a default 'todos-three' namespace is created.
2.1.2 - core.js (app root directory)
apps/TodosThree/core.jsTodosThree = SC.Application.create( /** @scope TodosThree.prototype */ { NAMESPACE: 'TodosThree', VERSION: '0.1.0', store: SC.Store.create().from(SC.FixturesDataSource.create({ simulateRemoteResponse: YES, latency: 250 })) });The code in core.js sets up TodosThree as an instance of SC.Application.
The TodosThree namespace is TodosThree: TodosThree.mainPage, TodosThree.todosController, etc.
A data store is created from SC.Record.fixtures, which is a way to simulate a real database. This is done by reading JSON-formatted sample data given from a fixtures javascript file, which we'll add in a later step. The SC.FixturesDataSource.create() call will set a latency of 250ms, otherwise it will load too fast for our app to have time to operate as it would in a normal web app situation.
2.1.3 - main.js (app root directory)
apps/TodosThree/main.jsTodosThree.main = function () { TodosThree.statechart.initStatechart(); }; function main() { TodosThree.main(); }The main.js file for TodosThree is very simple; we just initialize our application's statechart and let it handle the complexity.
2.1.4 - statechart.js (app root directory)
apps/TodosThree/statechart.jsTodosThree.statechart = SC.Statechart.create({ trace: YES, rootState: SC.State.design({ initialSubstate: "READY", READY: SC.State.plugin('TodosThree.READY'), LOGGING_IN: SC.State.plugin('TodosThree.LOGGING_IN'), SHOWING_APP: SC.State.plugin('TodosThree.SHOWING_APP'), SHOWING_DESTROY_CONFIRMATION: SC.State.plugin('TodosThree.SHOWING_DESTROY_CONFIRMATION') }) });Also edit the sc_config file to match the following:
var TodosThree = BT.AppBuilder.create({
  name: 'TodosThree',
  theme: 'sproutcore:aki',
  path: dirname(),
  title: 'TodosThree',
  frameworks: [],
  languages: ['en']
});
Make sure to restart the development server whenever you change the sc_config file.
**GIT**: git commit -a -m 'Edited files in the root app directory.'
The statechart is a defining characteristic of a SproutCore app. Discrete states in a statechart and the transitions between them allow a clean and simple design. In the TodosThree app statechart, the initial state is READY.
There are four states in the TodosThree statechart: READY, LOGGING_IN, SHOWING_APP, and SHOWING_DESTROY_CONFIRMATION. These are defined in individual files in the states directory.
2.2 - The States Directory
Code for individual states is held in the states directory. Change to that directory:
$ cd ~/development/sproutcore/getting_started/apps/TodosThree/statessproutcore gen created a file called ready_state.js in the states directory. We are going to use it for the TodosThree app, but to make it match our file naming pattern, rename it to ready.js:
$ mv ready_state.js ready.jsFiles to edit or add in the apps/TodosThree/states directory are:
ready.js logging_in.js showing_app.js showing_destroy_confirmation.js 2.2.1 - READY State (replace content of renamed ready.js)
apps/TodosThree/states/ready.jsTodosThree.READY = SC.State.design({ enterState: function() { if (SC.instanceOf(TodosThree.store.dataSource, SC.FixturesDataSource)) { TodosThree.todosController.set('content', TodosThree.store.find(SC.Query.local(TodosThree.Todo, { orderBy: 'timestamp DESC' }))); TodosThree.completedTodosController.set('content', TodosThree.store.find(SC.Query.local(TodosThree.Todo, { conditions: 'isCompleted = true' }))); } else { this.gotoState('LOGGING_IN'); } }, didLoad: function () { if (TodosThree.todosController.get('status') === SC.Record.READY_CLEAN) { this.gotoState('SHOWING_APP'); } }.stateObserves('TodosThree.todosController.status'), exitState: function() { // Nothing to worry about here. } });You have seen different conventions for naming states. The style used here makes the state names prominent.
When the statechart is initialized in the TodosThree.main() function, program control will go to the READY state, specifically to its enterState() function, where there is a check for the type of dataSource set on the store. Because it is an instance of FixturesDataSource, there is initialization of the data controllers, instead of going directly to the LOGGING_IN state, which we won't use in the TodosThree app. In a larger app, the data loading would probably come at some point after logging in, in a state dedicated to the task.
We see our first observer function in didLoad(). This function is fired when the trigger given in the chained call happens: .stateObserves('TodosThree.todosController.status'). In human language, this means:
If the status of the content changes, fire this function.
When the didLoad function is fired, there is an explicit check to see that the status change was to become SC.READY_CLEAN, and if so, to move control to the SHOWING_APP state.
This is a common pattern in SproutCore apps: Use bindings, described in a section below, whenever you can to solve most problems, but there are also cases to use an observer function to wait for some task to complete before firing. Try not to abuse observers, however, because in certain situations, there are performance penalties. This is especially true where you do not follow best practices for wiring things together, and there is inefficient, or even unneeded updating.
Here we are creating an observer in a state, so we use the dedicated .stateObserves() observer style, but in general use, the observer function, used in exactly the same way, is simply called .observes(). There are nuances to learn about specifying paths in observer declarations, such as how to use absolute (a.b.c) vs. relative paths (.b.c), and how to use chained absolute (ab.c) vs. chained relative (b.c) paths. We will leave the details for other documentation, where a full coverage can be given to how each use specifies a different set of triggers for an observer update.
2.2.1.1 - *Initialization of the Controllers*
Controllers are part of the communications system, often used specifically as interfaces to data models, in concert with the statechart, which covers more general purpose connections. Controllers needn't contain a large amount of code to play a key role, and often don't. We distinguish between array and object controllers; in TodosThree, we only use SC.ArrayController.
Data content of the two array controllers used in TodosThree is set in enterState() by issuing data query find calls to the store. SC.Query.local() is used because we know we don't have to find the data remotely in the TodosThree app. We search for todos, referencing the TodosThree.Todo model (an SC.Record instance). For the primary controller, todosController, we search for all the todos, ordering them by their timestamp property. For the completedTodosController, we search for all the todos for which isCompleted is true.
These aren't "one-time searches." They are associations set between the 'content' property of a controller and a store.find() query. This is a very powerful construct, explaining how SproutCore apps get part of their automatic and always up-to-date aspect.
**GIT**: git commit -a -m 'Renamed ready_state.js file to ready.js. Edited to add controller content setting code.'
2.2.2 - LOGGING_IN State
apps/TodosThree/states/logging_in.jsTodosThree.LOGGING_IN = SC.State.design({ initialSubstate: "SHOWING_LOGIN", SHOWING_LOGIN: SC.State.design({ enterState: function() { }, exitState: function() { }, authenticate: function() { } }) });We won't use the LOGGING_IN state in TodosThree, but have it here for illustration.
2.2.3 - SHOWING_APP State
apps/TodosThree/states/showing_app.jsTodosThree.SHOWING_APP = SC.State.design({ enterState: function() { TodosThree.mainPage.get('mainPane').append(); TodosThree.mainPage.get('field').becomeFirstResponder(); }, exitState: function() { }, addTodo: function (view) { var todo = (view.get('value') || '').trim(); if (todo !== '') { TodosThree.store.createRecord(TodosThree.Todo, { title: todo, timestamp: SC.DateTime.create() }); view.set('value', ''); } }, clearCompletedTodos: function() { this.gotoState('SHOWING_DESTROY_CONFIRMATION'); } });In the SHOWING_APP/enterState() function, we want a blinking cursor in the new todo text field. This is accomplished by setting this field to become first responder in the events system.
This state handles two actions, addTodo and clearCompletedTodos. There are references to view code (view.) which we will see in the mainPage view in the resources directory.
2.2.4 - SHOWING_DESTROY_CONFIRMATION State
apps/TodosThree/states/showing_destroy_confirmation.jsTodosThree.SHOWING_DESTROY_CONFIRMATION = SC.State.design({ _panel: null, enterState: function() { var displayDescription = "Are you sure that you wish to clear the following tasks?<br /><br />"; var completedTodos = TodosThree.completedTodosController; displayDescription += "<ul>"; displayDescription += completedTodos.map(function(t) { return "<li>%@</li>".fmt(t.get('title')); }).join('\n'); displayDescription += "</ul>"; this._panel = SC.AlertPane.warn({ layout: { centerX: 0, top: 80, width: 380, bottom: 80 }, defaultResponder: TodosThree.statechart, message: "Clear Completed Todos", displayDescription: displayDescription, buttons: [ { title: 'Clear', action: 'confirm' }, { title: 'Cancel', action: 'cancel' } ] }); }, exitState: function() { // No need to do anything here, the SC.AlertPane will remove itself. }, confirm: function() { TodosThree.completedTodosController.invoke('destroy'); this.gotoState('SHOWING_APP'); }, cancel: function() { this.gotoState('SHOWING_APP'); } });When the SHOWING_DESTROY_CONFIRMATION state is entered, the current list of completed todos is grabbed and formatted nicely, and then a warning pane is shown to make sure that the user actually wants to delete their completed todos. If so, we tell the completedTodosController to destroy the current completed todos. Then, we go back to the SHOWING_APP state so that the user can enter more todos.
The SHOWING_DESTROY_CONFIRMATION state illustrates how states are just objects: you can add local variables to them as you would for any other. You learn to think about a state as something built unto its own for some task, fleshed out with needed properties, bindings, workhorse functions and the like.
_panel is a local variable in the state, marked with a beginning underscore to signify that it is not connected to anything external.
completedTodos sets up a local property as a reference to the completedTodosController, for ease of use in this case: in the code for displayDescription, you see where the succinct name completedTodos is used. When we tack Binding onto the end of a property declaration, as with xBinding = something, we are creating a property called x, which works via a binding (completedTodos is x here).
**GIT**: git add . & git commit -a -m 'Added additional states.'
2.3 - The Resources Directory
We've covered the highest-level parts of the app defined in the statechart. Let's add the rest.
The mainPage view, CSS file, a theme file, and an html page live in a directory called resources. Go to that directory:
$ cd ~/development/sproutcore/getting_started/apps/TodosThree/resourcesFiles to edit or add in the apps/TodosThree/resources directory are:
main_page.js todo_item.js _theme.css styles.css loading.ejs 2.3.1 - main_page.js (resources directory)
apps/TodosThree/resources/main_page.js//sc_require('resources/todo_item'); // Not used. See comments below about exampleView. TodosThree.mainPage = SC.Page.design({ field: SC.outlet('mainPane.newTodoField.field'), mainPane: SC.MainPane.design({ childViews: ['header', 'newTodoField', 'todosList', 'footer'], defaultResponder: "TodosThree.statechart", header: SC.ToolbarView.design({ layout: { centerX: 0, width: 500, top: 0, height: 36 }, childViews: ['title', 'completeAll'], completeAll: SC.CheckboxView.design(SC.AutoResize, { autoResizePadding: { width: 47 }, title: 'Mark all as done', valueBinding: 'TodosThree.completedTodosController.areAllCompleted' }), title: SC.LabelView.design({ layout: { left: 0, right: 0, top: 0, bottom: 0 }, totalTodosBinding: SC.Binding.oneWay('TodosThree.todosController.length'), completedTodosBinding: SC.Binding.oneWay('TodosThree.completedTodosController.length'), value: function () { return 'TodosThree (' + (this.get('totalTodos') - this.get('completedTodos')) + ')'; }.property('totalTodos', 'completedTodos').cacheable() }) }), newTodoField: SC.View.design({ classNames: ['new-todo'], layout: { centerX: 0, width: 500, top: 36, height: 36 }, childViews: ['field', 'button'], field: SC.TextFieldView.design({ hint: 'What needs to be done?' }), button: SC.ButtonView.design(SC.AutoResize, { controlSize: SC.HUGE_CONTROL_SIZE, layout: { centerY: 0, height: 30, right: 12, zIndex: 100 }, title: 'Add', action: 'addTodo', valueBinding: '.page.field.value', isDefaultBinding: '.page.field.focused' }) }), todosList: SC.ScrollView.design({ layout: { centerX: 0, width: 500, top: 72, bottom: 36 }, contentView: SC.ListView.design({ contentBinding: SC.Binding.oneWay('TodosThree.todosController'), rowHeight: 36, // exampleView: TodosThree.TodoItemView // If pulled in from external file. exampleView: SC.CheckboxView.design({ classNames: ['todo-item'], valueBinding: '.content.isCompleted', titleBinding: SC.Binding.oneWay('.content.title') }) }) }), footer: SC.ToolbarView.design({ layout: { centerX: 0, width: 500, bottom: 0, height: 36 }, childViews: ['clearCompletedTodos'], clearCompletedTodos: SC.ButtonView.design(SC.AutoResize, { controlSize: SC.HUGE_CONTROL_SIZE, layout: { centerY: 0, height: 30, right: 12, zIndex: 100 }, isEnabledBinding: SC.Binding.oneWay('TodosThree.completedTodosController.length').bool(), title: 'Clear completed todos', action: 'clearCompletedTodos' }) }) }) });There are four parts to the TodosThree mainPage view: a header and footer, and between them are a newTodoField and a todosList. A user types a new todo in the newTodoField, and when they click the button, labeled 'Add', the new todo is added by means of the todosController's addTodo action. The new todo will show up in the todosList. How does this happen? We see the use of bindings again. Look at the lines that have Binding in the property names. When you write user interface element code, you "wire up" these connections with such binding instructions.
2.3.1.1 - *Toolbars in header and footer*
The header view is an SC.ToolbarView with two child views: a completeAll checkbox view and a title label view. The valueBinding property of the checkbox is tied to an areAllCompleted() function in the completedTodosController, which answers that question -- if yes, then the completeAll checkbox will show as checked. This is a two-way binding, so it works in reverse. If the user clicks the completeAll checkbox, then areAllCompleted() will set isCompleted to true for all todos. That makes areAllCompleted() a very special type of function, called a computed property.
As an introduction to computed properties, we start with a basic one in the title view, an SC.LabelView. You see two local properties as totalTodosBinding and completedTodosBinding. The computed property is the value, declared with a normal no-argument function signature, with .property('totalTodo', 'completedTodos').cacheable() chained onto the end. The chained part means:
Base this computed property on the totalTodos and completedTodos properties, and update it if either of them changes, and, also, cache the value so unnecessary updates are avoided.
Note again that the way of setting a binding, as with totalTodosBinding, results in the creation of a property that is referred to as just totalTodos. You see this in the two this.get() calls where the completedTodos are subtracted from the totalTodos.
Computed properties, so important in SproutCore, are given a fuller description below, and in other guides pages.
The footer view has a single child view, clearCompletedTodos, which is a button whose action is the clearCompletedTodos action in the SHOWING_APP state. The isEnabledBinding property has a one-way binding (faster, if you don't need two-way, reciprocal updating) to the length of the completedTodosController array. If its length is 0, then isEnabled is false and the button will not be active -- if there aren't any todos, there is nothing to clear.
2.3.1.2 - *newTodoField*
The newTodoField view contains a text field called field and a button. The button has two properties that are bound to the associated text field. The valueBinding property is bound to field.value, which is the text the user enters. Note the use of .page in the valueBinding definition. In this context, page refers to the page itself, a helpful global available. Note at the top of the file there is a declaration of an outlet called field, so we have a handy reference to the business end of this whole view, .page.field, which is the newTodoField view's field. References can be cumbersome. Outlets help.
The isDefaultBinding property also involves an interesting path. The reference to the focused boolean will make the field become inactive if focus goes elsewhere.
Property path syntax -- e.g., the leading . in .page.field.focused -- is something you have to look up repeatedly until you are comfortable. In the case of the . here, it means that the path is relative to here, this scope.
2.3.1.3 - *todosList*
The todosList view follows the SproutCore idiom for wrapping an SC.ListView inside an SC.ScrollView. The contentBinding property of the list is set to TodosThree.todosController.
2.3.2 - todo_item.js (resources directory)
apps/TodosThree/resources/todo_item.jsTodosThree.TodoItemView = SC.CheckboxView.design({ classNames: ['todo-item'], valueBinding: '.content.isCompleted', titleBinding: SC.Binding.oneWay('.content.title') });This file is not used in the app, but is here for illustration of how you could pull in code from an external source file. If you look at resources/main_page.js, you will see that the TodosListView has exampleView set as "inline" code for the same checkbox view you see in this resouces/todo_item.js file. Instead of defining the exampleView there as an "inline" code block, the require that is commented out at the top of resources/main_page.js could be used, and the exampleView would be set with the usual property definition, exampleView: TodosThree.TodoItemView, which would come from the required resources/todo_item.js file.
Whether you declare your exampleView inline or pull it in from an external file depends on its size and complexity. In TodosThree, it is small enough to declare inline. Whatever the case, we can describe what this code does. It helps to focus on the context of this code block within the list view, so look again at the resources/main_page.js file.
TodoItemView is a checkbox, which has a label. You see a bit of wiring to CSS in the classNames property, an array of CSS class names that are to be applied to this view. valueBinding has a reference to .content.isCompleted. What is the context for this reference? We know that this view is defined as the exampleView property of the todos list. The term example here means "the view to use for each list item." List items for the todos list are todos, which are defined in the TodosThree.Todo model. So, .content used in the TodoItemView definition refers to a single todo item in the list. .content.isCompleted refers to this property of a todo item. Likewise, titleBinding is bound to the title property of a list todo item.
It helps to name such views as SomethingItemView, because the Item part indicates the use in a list.
2.3.3 - _theme.css (resources directory)
apps/TodosThree/resources/_theme.css/* This defines the global $theme variable for use inside your CSS. The $theme variable holds the CSS class names for your theme. You can then theme your app by using CSS like this: $theme.button { color: blue; @include slices('white-button.png', $left: 3, $right: 3); } Any _theme.css file is prepended to all files inside its directory, and any subdirectories that don't define their own _theme.css file. This allows you to give different directories different values for $theme if you wish. */ $theme: '.aki.todos-three';The underscore starting the name of _theme.css is a dead giveaway that it must apply in some special way to the theming system. It defines $theme to be our Aki-derived theme, aki.todos-three, a reference used in CSS code.
A _theme.css file is a per directory (and subdirectories) reference definition, allowing hierarchical control for using different themes.
2.3.4 - Content CSS file
You can add a single CSS file in your resources directory, or you can add many small ones. For the TodosThree app, we'll choose the single file approach. In this CSS file, where you see something like $theme.sc-text-field-view, the sc- prefix indicates an override of the sc- CSS definitions in the Ace theme. Inspect your browser's elements listing, and you will see these references. In practice, you often need to dive into such an elements listing, and the fancy mouse-driven browser inspection tools, to diagnose CSS problems, such as the case of having bad math that results in one view obscuring another.
CSS is an art unto itself, an important side of doing SproutCore development and building views.
2.3.4.1 - *styles.css (resources directory)*
apps/TodosThree/resources/styles.css$theme: '.aki.todos-three'; body { -webkit-font-smoothing: antialiased; text-rendering: optimizelegibility; } /* Fix for Chrome bug on accelerated panes */ .sc-pane { -webkit-transform: none; } $theme.sc-main { background: -moz-linear-gradient(top, #ddd, #bbb); background: -webkit-gradient(linear, 0%, 0%, 0% 100%, from(#ddd), to(#bbb)); } $theme.sc-container-view { background: #fff; } $theme.sc-text-field-view { font-size: 14px; .hint { font-size: 14px; line-height: 30px; } .padding { left: 14px; } } $theme.toolbar { .checkbox { .button { left: 13px; top: 50%; margin-top: -8px; } .sc-button-label { left: 47px; line-height: 36px; } } .sc-label-view { text-align: right; line-height: 36px; font-weight: bold; font-size: 18px; padding-right: 12px; } } $theme.todo-item { .button { left: 13px; top: 50%; margin-top: -8px; } .sc-button-label { left: 47px; line-height: 36px; } &.sel { background-color: white; color: #AAA; .sc-button-label { text-decoration: line-through; } } }2.3.5 - loading.ejs (resources directory)
Because of the complexity SproutCore supports, SproutCore apps can weigh in north of the welterweight class, so while the app is loading we may need to show a loading indicator. For TodosThree we don't have to worry, but in larger apps, this file could need some attention.
apps/TodosThree/resources/loading.ejs<!-- # Any HTML in this file will be visible on screen while your page loads # its application JavaScript. SproutCore applications are optimized for # caching and startup very fast, so your users will often only see this # content for a brief moment on their first app load, if at all. --> <p class="loading">Loading...<p>**GIT**: git add . & git commit -a -m 'Edited/Added resources files.'
2.4 - The Models Directory
sproutcore gen does not make a models directory, so we'll make it.
Move to the app root directory, make a models directory, and go there:
$ cd ~/development/sproutcore/getting_started/apps/TodosThree
$ mkdir ~/development/sproutcore/getting_started/apps/TodosThree/models
$ cd ~/development/sproutcore/getting_started/apps/TodosThree/models
SproutCore models are based on SC.Record, which offers a substantial set of data definition and processing functionality.
The models directory will contain one file:
todo.js 2.4.1 - todo.js (models directory)
apps/TodosThree/models/todo.jssc_require('core'); TodosThree.Todo = SC.Record.extend({ timestamp: SC.Record.attr(SC.DateTime), isCompleted: SC.Record.attr(Boolean), title: SC.Record.attr(String) });The Todo model has three properties: timestamp, isCompleted, and title. All are defined using the SC.Record.attr() helper (convenience) function, where builtin javascript types and Sproutcore types may be specified. There is much more that could be done in these property definitions, but for TodosThree, the basic types and their defaults will suffice.
Recall discussion of good habits regarding sc_require. The use of sc_require('core'); here is not mandatory, but it is a good habit: TodosThree is defined in core.js.
**GIT**: git add . & git commit -a -m 'Added models directory and todo model file.'
2.5 - The Controllers Directory
sproutcore gen does not make a controllers directory, so we'll make it.
Move to the TodosThree app root directory, make a controllers directory, and go there:
$ cd ~/development/sproutcore/getting_started/apps/TodosThree/controllersControllers mediate communications. We'll need a couple in the TodosThree app.
The controllers directory will contain two files:
todos.js completed_todos.js 2.5.1 - todos.js (controllers directory)
apps/TodosThree/controllers/todos.jssc_require('core'); TodosThree.todosController = SC.ArrayController.create({ });2.5.2 - completed_todos.js (controllers directory)
apps/TodosThree/controllers/completed_todos.jssc_require('controllers/todos'); TodosThree.completedTodosController = SC.ArrayController.create({ totalTodosBinding: SC.Binding.oneWay('TodosThree.todosController.length'), areAllCompleted: function (k, v) { if (v !== undefined) { TodosThree.todosController.setEach('isCompleted', v); } return this.get('length') === this.get('totalTodos'); }.property('length', 'totalTodos').cacheable() });The todosController has the simplest default definition as an SC.ArrayController. An array controller has a default content reference to the data: you don't see a content property defined here, but take note, because you'll see prevalent use of the content property in most things controller.
The completedTodosController is another array controller. It has a property called totalTodosBinding, and a function called areAllCompleted().
totalTodosBinding is simple enough. It is a one-way binding (we are "pulling", we don't care about pushing back) to the length of the todosController array controller. We need a local reference to this length, because we are about to do something impressive, in part based on it.
2.5.2.1 - *The areAllCompleted() Computed Property*
areAllCompleted() is a function, but that very special type of function, the computed property you have seen in its simpler usage as a "getter." Here we are using a computed property as both a setter and a getter. You see the .property() call hanging on the end of the function definition. This gives 'length' and 'totalTodos' as dependencies for updating, then tacks on .cacheable(). We have a 'length' property available -- this is a built-in property of an array controller. Quiz from something explained earlier: isn't the property called totalTodosBinding not totalTodos? Recall that the answer is that anytime Binding is seen at the end of a property name, you have a kind of dual-property arrangement. The "actual" property is, in fact, totalTodos. In defining totalTodosBinding, we essentially say to get the value of totalTodos from this other source.
That covers the background on mechanics of property names and bindings. As before, here is a human language explanation of the chained calls on the end (.property('length', 'totalTodos').cacheable()):
Base this computed property on the length and totalTodos properties, and update it if either of them changes, and, also, cache the value so unnecessary updates are avoided.
There is more to learn about the working of this computed property. What are the k and v parameters, and what does the internal code do? k and v are key and value. On a call, if v is a defined value, then the totalTodos value is being changed. This is a mandate to try to mark all todos as completed by this value. The name of the computed property is areAllCompleted. If a call is made to set it, then the body of the function needs to update the data accordingly. If v evaluates to true, then isCompleted for each todo item will be set and all the checkboxes will be checked in the list. That explains what the if block does.
Notice the return on the last line in areAllCompleted(). We return the result of a test comparing the length of the array (the local 'length') to the length of the todos array (the local 'totalTodos', which is bound to an external source, the full todosController array). If these lengths are the same, then all todos have been marked as completed, otherwise no.
**GIT**: git add . & git commit -a -m 'Added controllers directory and controller files.'
2.6 - The Fixtures Directory
Move to the TodosThree app root directory and go to the fixtures directory:
$ cd ~/development/sproutcore/getting_started/apps/TodosThree/fixturesThe fixtures directory will contain one file:
todo.js 2.6.1 - todo.js (fixtures directory)
apps/TodosThree/fixtures/todo.jssc_require('models/todo'); TodosThree.Todo.FIXTURES = [ { guid: 0, isCompleted: true, title: 'Add a SHOWING_APP state' }, { guid: 1, isCompleted: true, title: 'Edit the buildfile' }, { guid: 2, isCompleted: true, title: 'Add a TodosThree app' }, { guid: 3, isCompleted: true, title: 'Install SproutCore' } ];**GIT**: git add . & git commit -a -m 'Added fixtures directory and fixture file.'
3 - Running the App
With all that work done (or if you downloaded the code or cloned it from git) we can run the app, which we should do from the project root directory, where the project Buildfile lives:
$ cd ~/development/sproutcore/getting_startedAnd run it!
$ sproutcore serveVisit http://localhost:4020/ in your favorite modern browser and you should see a list of apps, including TodosThree.
4 - Where to Go from Here
There are several guides next that treat the build tools, core concepts, several additional pages about views, including how to use models (records and fixtures), theming, and testing.
The guides page called "Core View Concepts" is being updated to mesh better with the Getting Started guides.
5 - Summary of the Getting Started Guides
The following steps are the from Getting Started: Parts 1, 2, and 3, this guide.
5.0.1 - Setting up the project
cd ~/development/sproutcore
sproutcore init getting_started
cd ~/development/sproutcore/getting_started
git init & git add Buildfile & git add README & git commit -a -m 'First Commit. Added getting_started project with _sproutcore gen project getting_started_ command'
5.0.2 - Generating TodosOne
sproutcore gen app TodosOne
git add apps & git commit -a -m 'Added TodosOne app with _sproutcore gen app TodosOne_ command'
5.0.3 - Inspect the state charts in TodosOne
5.0.4 - Generating TodosThree and Doing the Steps Above
sproutcore gen statechart_app TodosThree
git add apps/TodosThree & git commit -a -m 'Added TodosThree app with _sproutcore gen statechart_app TodosThree_ command'
cd ~/development/sproutcore/getting_started
- edited file: apps/TodosThree/theme.js
- edited file: apps/TodosThree/core.js
- edited file: apps/TodosThree/main.js
- edited file: apps/TodosThree/statechart.js
git commit -a -m 'Edited files in the root app directory.'
cd ~/development/sproutcore/getting_started/apps/TodosThree/states
renamed file: ready_state.js to ready.js
- edited file: apps/TodosThree/states/ready.js
git commit -a -m 'Renamed ready_state.js file to ready.js. Edited to add controller content setting code.'
- edited file: apps/TodosThree/states/logging_in.js
- edited file: apps/TodosThree/states/showing_app.js
- edited file: apps/TodosThree/states/showing_destroy_confirmation.js
git commit -a -m 'Added additional states.'
cd ~/development/sproutcore/getting_started/apps/TodosThree/resources
- edited file: apps/TodosThree/resources/main_page.js
- edited file: apps/TodosThree/resources/todo_item.js
- edited file: apps/TodosThree/resources/_theme.css
- edited file: apps/TodosThree/resources/styles.css
- edited file: apps/TodosThree/resources/loading.ejs
git commit -a -m 'Added resources files.'
cd ~/development/sproutcore/getting_started/apps/TodosThree
- made directory: ~/development/sproutcore/getting_started/apps/TodosThree/models*
cd ~/development/sproutcore/getting_started/apps/TodosThree/models
- edited file: apps/TodosThree/models/todo.js
git add models & git commit -a -m 'Added models directory and todo model file.'
cd ~/development/sproutcore/getting_started/apps/TodosThree
- made directory: ~/development/sproutcore/getting_started/apps/TodosThree/controllers*
cd ~/development/sproutcore/getting_started/apps/TodosThree/controllers
- edited file: apps/TodosThree/controllers/todos.js
- edited file: apps/TodosThree/controllers/completed_todos.js
git add controllers & git commit -a -m 'Added controllers directory and controller files.'
cd ~/development/sproutcore/getting_started/apps/TodosThree
- made directory: ~/development/sproutcore/getting_started/apps/TodosThree/fixtures*
cd ~/development/sproutcore/getting_started/apps/TodosThree/fixtures
- edited file: apps/TodosThree/fixtures/todo.js
git add fixtures & git commit -a -m 'Added fixtures directory and fixture file.'
6 - Changelog
- March 1, 2011: initial version by Tom Dale and Yehuda Katz
- March 2, 2011: fixed formmating and added paths to filenames by Topher Fangio and Peter Wagenet
- March 22, 2011: cleaned up demo based on new features by Yehuda Katz
- April 11, 2011: consistently use view classes and extend, update to reflect better Handlebars integration by Yehuda Katz and Tom Dale
- May 6, 2011: clarifications, minor inconsistency fixes, updated CSS for older browsers, plus new mobile section by Tyler Keating
- May 9, 2011: update for recent changes in SproutCore 1.6 by Tom Dale and Yehuda Katz
- March 6, 2012: rewrite for SproutCore 1.8 by the 1.8 release sprint team, including the following who did much work on this task: Tim Evans, Topher Fangio, Jeff Pittman
- July 30, 2013: converted to Markdown format for DocPad guides by Eric Theise
- July 30, 2013: fix issues with formatting and updated Changelog by Topher Fangio
- January 17, 2019: Update the guide to reflect changes from the NodeJS build tools and CSS names by Maurits Lamers
 Chapters
- sc_config